Mission Viejo Tile Roof Replacement
- Alas & Bravo
- Aug 2, 2021
- 3 min read

Updated: Aug 25, 2021

This is a roof replacement project I completed in the city of Mission Viejo. Here, I replaced the home's previous Concrete S tile roof with new Boral Saxony shake tile. It took about 2 weeks to complete the project pictured here; from tear off to installation. Today I will give a general overview of the steps required to complete this home renovation project.
First, I began by tearing off the existing roofing system down to the roof deck layer. The torn-off layers were discarded and hauled away to waste or recycling locations. I swept and cleaned the roof deck of any debris and inspected the substrate layer to identify what needs replacing.
With the roof deck exposed, it is at this stage where a roofer can accurately identify how much woodwork the project will require. The homeowner is informed of any damaged or deteriorated substrate that will need to be replaced before any more work is to begin. It is important to replace all deteriorated or damaged wood in order to meet city inspection requirements.


Once damaged wood is replaced and the first inspection has been passed, I can begin work on installing the next layer in the roofing system, the roof underlayment, and flashings. Next, I installed 2 layers of ASTM #30 tar paper underlayment over the entire roofing area. I also installed 2x2 baked enamel eave drip trim at the perimeter of the roof. Eave risers are also installed at all eave areas to elevate tile courses in that area to the proper height. They also prevent birds and other small animals from nesting in the roofing system
For this home, I used a dual flashing system, where each roof penetration has a separate base flashing that is integrated with the underlayment system. Metal flashings are installed at any roof penetrations like pipes, attic vents, chimneys, and skylights. At this home, a majority of the roof penetrations were located on the backside of the building to keep the home's sleek architectural finish.
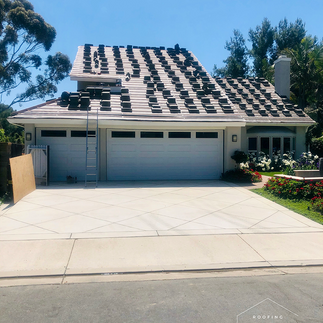
In the images shown here, you can see the project once the 2 layers of underlayment have been completely installed. You can also see the stage where I finished installing the roofing battens. Battens are used as a fixing point for tiles on steep roofs. It provides an area on which to fasten them securely. Finally, you can see the delivered flat tiles that were installed on the home. As well as the stacking method and layout employed in preparation for their installation.


There is a lot of detailed work that goes into the proper installation of the roof. From ensuring that the underlayment is neatly overlapped to the proper installation and waterproofing on flashing seals. Installing tiles also requires similar attention to detail as the proper course height is required when fastening the tiles to ensure the watertight seal on the final layer of the roofing system.
For this project, the homeowners selected Boral Saxony tiles in the color Sahara Quartz Blend. Inspired by the southwest and the colors of a desert sunrise, this tile blend adds shades of multicolor grey, brown, and green to the roof. On this roof, the earth tones blend in a sense of the traditional and modern by weaving hints of color to the roof's steep sharp edges.
For the final step, I sealed all roof penetrations with cement before finally painting all penetrations and flashings to match the new roofing color. At this project, I also completed work on two small flat areas in the home. One was over a small balcony on the backside of the home and an area where I removed an existing skylight over the garage area.
For these flat areas on the roof, I installed a 28 lb fiberglass base sheet, 2x4 gravel guard around the perimeter of the flat area, and a Cap sheet of APP Torch. I used Henry 887 Tropi-Cool 100% Silicone White Coating for the final sealant and color finish. With the new roofing system finally completed, the roof undergoes a final inspection from the city.
Pictured here you can see the final stage of the roof replacement project. Shown here are the sealed and painted roof penetrations as well as a view of the small flat areas completed on the roof. You can also get a better view of the Sahara Quartz blend and how the different shades of color are reflected from different angles of the roof. Contact us at Alas & Bravo Roofing if you would like an estimate for your home roof replacement project.


Comments